When faced with the problem of scratching discs one starts to seek the alternatives to wearing out once expensive GameCube games. One solution is making a backup copies of our games and playing (and inevitably scratching) them while the original ones sit safely on the shelf.
Creating and playing backups is not endorsed by Nintendo so we need to somehow fit our GameCube with the possibility to load copies on our own. Popular choices include SD Media Launcher as a non-intrusive solution or the variety of modchips which have to be soldered to the drive control board in order to operate. A few short years ago the XenoGC modchip was amongst the most used chips on the market due to it's low price, relatively easy installation and good compatibility. Unfortunately, nowadays it's quite rare to stumble upon an affordable and available modchip. It seems that the XenoGC authors have ended the production and the few units resellers still have in stock have reached the high price level. Thankfully the authors have also released the full sources of the XenoGC firmware, so with a bit of determination and right tools we can change a small, cheap heap of electronics into a working XenoGC modchip.
The XenoGC is based on the Atmel Atmega8L microcontroller, but we can alternatively also use Atmega8 or Atmega8A instead, as they're all compatible from the point of view of creating a XenoGC-like chip. That part alone costs a couple of euros, the rest are mainly supporting components:
Optionally you'd also need a perforated pertinax board, a 28pin narrow IC socket and a hot glue gun, but this varies based on how are you going to accommodate the space inside the GameCube, as it's generally a limited commodity. I opted for building a robust version with as much redundancy in cabling and space as seemed appropriate, but I ended unable to fit it inside the console's casing. If I were to do it again I would use my experience to build a smaller version.
Note that you'll also need a big gamebit screwdriver in order to open the GameCube.
I used the Arduino Uno as an AVR ISP programmer and avrdude as the software. The command for checking whether the MCU was properly detected was as follows:

Next, I burned the fuses:

Finally, the hex itself:

Soldering the XenoGC board is not particularly hard. The one important thing worth taking into consideration is the difference between the Atmega8/8A and 8L MCUs. The latter has the continuity between the VCC and AVCC pins, while the former doesn't. This means the 8/8A MCUs needs the second 100nF capacitor between the AVCC and GND, while the 8L doesn't.


Note that the pins of the port are very small. You have to have thin wires and a steady hand in order to solder them properly and not short any connections. In the case of trouble desoldering tape is your friend.
Word of notice: the top left pin of the port is the 3.3V. It is suitable for Atmega 8L, but Atmega8 requires 5V, which you should get from elsewhere, for example from the bottom of the board:
 This is how I soldered the wires:
 Some hot glue ensured the wires stay in place well insulated:


Don't actually put the hot glue until you verified it working. The easiest way to do so is to power up the console and watch the LEDs. The red LED should light up and after a few seconds be replaced by the green one, like on the following video:
Note that in my case, the XenoGC would not work every time. It seems that each time I power up the console, there's around 25% chance of the LEDs not powering up, or just the red one staying lit. I don't know what exactly it is related to, nor whether this issue appeared on the original XenoGC, but it's not very annoying, just keep the LED on the visible spot, and reset the console until the green one lights up.
Afterwards the MCU board should be permanently attached to the GameCube, wherever you find enough space. I placed it on the outside, attached to the back of the console with some more hot glue:

 Two DE-15 connectors were used to be able to detach the MCU from the board in the future if the need arises.
Our GameCube is now happy to boot some backup media. Yay!
More pics
Creating and playing backups is not endorsed by Nintendo so we need to somehow fit our GameCube with the possibility to load copies on our own. Popular choices include SD Media Launcher as a non-intrusive solution or the variety of modchips which have to be soldered to the drive control board in order to operate. A few short years ago the XenoGC modchip was amongst the most used chips on the market due to it's low price, relatively easy installation and good compatibility. Unfortunately, nowadays it's quite rare to stumble upon an affordable and available modchip. It seems that the XenoGC authors have ended the production and the few units resellers still have in stock have reached the high price level. Thankfully the authors have also released the full sources of the XenoGC firmware, so with a bit of determination and right tools we can change a small, cheap heap of electronics into a working XenoGC modchip.
All you need now is a hammer
Important note: this guide includes instructions for opening your console and messing up with its internals. Be particularly attentive of the part where you apply 200° C hot solder to the delicate pins of the debug port on the motherboard. And all other dangerously sounding parts too.Author of this article takes no responsibility for any kind of damage caused by following these instructions, including, but not limited to continuing sadness, depression, feel of emptiness, and/or others. You are following the instructions on your own responsibility.

Basics
In order to create a XenoGC replica we need a decent soldering skills, a soldering iron, and a way to program Atmel Atmega8 MCU. It can be programmed using a regular AVR ISP programmer, an Adruino, or a hanful of home made programmers. I plan to write a blog post about turning Arduino Uno into an ISP programmer, but for now lets presume we have a working AVR programmer.
The parts themselves should not cost more than 10 euros in total, not counting tools.
- two 100nF capacitors
- one 1K reistor
- two 220/330R resistors
- two LEDs, preferrably in different colours, and
- a length of thin insulated wire.
Optionally you'd also need a perforated pertinax board, a 28pin narrow IC socket and a hot glue gun, but this varies based on how are you going to accommodate the space inside the GameCube, as it's generally a limited commodity. I opted for building a robust version with as much redundancy in cabling and space as seemed appropriate, but I ended unable to fit it inside the console's casing. If I were to do it again I would use my experience to build a smaller version.
Note that you'll also need a big gamebit screwdriver in order to open the GameCube.
Burn it
We're going to start with programming the Atmega MCU with the precompiled XenoGC binary, which can be downloaded from here. The package includes the full source code which can be useful for further development, as well as few binaries for different versions of XenoGC firmware. The differences between files can be read on the GC Forever Wiki. It makes no big difference which file we decide to use, as far as we pick the working version and suitable for our console's region.I used the Arduino Uno as an AVR ISP programmer and avrdude as the software. The command for checking whether the MCU was properly detected was as follows:
avrdude -p m8 -c avrisp -P COM3 -b 19200

Note that I had to override the baudrate or the avrdude would bomb out. In your case you should adjust the programmer and serial port params if they differ.
avrdude -p m8 -c avrisp -P COM3 -b 19200 -v -U lfuse:w:0xC4:m -U hfuse:w:0xD9:m

avrdude -p m8 -c avrisp -P COM3 -b 19200 -v -U flash:w:your_file_name:i

Build it
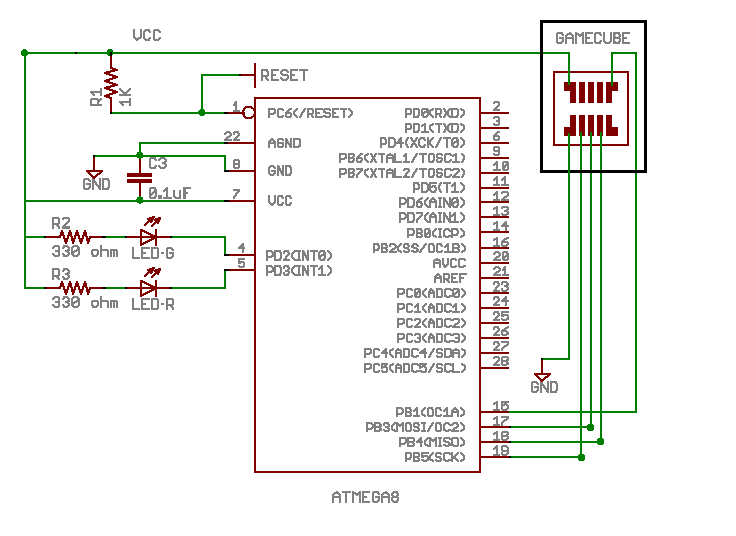
Soldering the XenoGC board is not particularly hard. The one important thing worth taking into consideration is the difference between the Atmega8/8A and 8L MCUs. The latter has the continuity between the VCC and AVCC pins, while the former doesn't. This means the 8/8A MCUs needs the second 100nF capacitor between the AVCC and GND, while the 8L doesn't.
LED's are not required but useful to confirm the XenoGC was installed (and is functioning) correctly.
Original design used green one on pin 4 and red one on pin 5, but you can use whatever colours you want.
You should solder the MCU and leave the long-ish strip of thin wires for the connection to the debug port. If you make your board small and compact you might cram it inside the GameCube, otherwise plan how to attach it outside of the casing.
When you have soldered the board you should open your console and lift the drive control board to access the debug port.

Word of notice: the top left pin of the port is the 3.3V. It is suitable for Atmega 8L, but Atmega8 requires 5V, which you should get from elsewhere, for example from the bottom of the board:


Don't actually put the hot glue until you verified it working. The easiest way to do so is to power up the console and watch the LEDs. The red LED should light up and after a few seconds be replaced by the green one, like on the following video:
Note that in my case, the XenoGC would not work every time. It seems that each time I power up the console, there's around 25% chance of the LEDs not powering up, or just the red one staying lit. I don't know what exactly it is related to, nor whether this issue appeared on the original XenoGC, but it's not very annoying, just keep the LED on the visible spot, and reset the console until the green one lights up.
Afterwards the MCU board should be permanently attached to the GameCube, wherever you find enough space. I placed it on the outside, attached to the back of the console with some more hot glue:


Our GameCube is now happy to boot some backup media. Yay!
More pics

I was also having trouble with the Xeno not working everytime, I found that by connecting the Reset point at the bottom left side of the board to the Reset/pin 1 of the Atmega8L solved the problem and made it work 100%.
ОдговориИзбришиAwesome! Thanks for the tip.
Избришиconnect what to where exactly? did you run a 7th wire from rst on mcu to the gamecube?
ОдговориИзбришиdid you run another wire from the rst pin to the game cube?
ОдговориИзбриши